Friday, December 31, 2010

Happy New Year!

Out of all the cool experiences that I've had in 2010, I would have to say that working on the East Coast/West Coast Tablescape Challenge for the Children's Party Network had the biggest impact on me for a couple of reasons. First, being new on the scene, I was incredibly honored to be asked to participate alongside established party people. Second, the challenge forced me to try different crafting techniques (like my new favorite thing - embossing) that are now a part of my repertoire.

My contribution to the challenge (that we won by the way - go Team East!) were the invitations. Since it is New Year's Eve, I thought it would be fun to show you the initial drafts that I created before committing to the final design - enjoy!

Just to refresh your memory, the challenge was to create black & white themed items for a children's New Year's Eve party. However, our team was further challenged to incorporate the Sunday comics into the designs as well - no pressure!

Design #1: Cartoon Callout Clouds


Design #2: Blinged-out Mickey Clock


Design #3: Old School B&W Mickey Mouse Cartoons


Design #4: My homage to a Jordan Ferney design


The Final Design - pictures courtesy of Artistic Soul Photography:


Hope you have a fabulous holiday - I can't wait to see what 2011 brings!

Friday, December 17, 2010

Dollar Tree Christmas Challenge

Somehow in between holiday shopping, decorating, school parties and planning a baby shower (future post), I found time to enter a holiday craft contest. Dollar Tree is sponsoring a really cool challenge to "create a holiday-themed decoration using materials totaling $20 or less". I stumbled across this contest last week when I was shopping for items for this post. I immediately knew what I wanted to make - see if you can figure it out.

I used these products...


and these too...


Any guesses? It's a gingerbread house!


One of my favorite things is to find creative ways to use items not for their intended purpose. This challenge gave me a lot of chances to do just that. For instance, I used a light brown non-slip shelf liner for the gingerbread walls. I also found some great plastic clothes lines that looked like peppermint sticks - they are used for the trim on the house. But my absolute favorite item on the house is a plastic popcorn container - it's the roof!


The craft that receives the most votes will be declared the winner. The voting period runs from now through Dec 29 (only 1 vote per day is allowed). I would love it if you could swing over to Dollar Tree's site and vote for my little house here (click on the image - a vote button is present in the lower right corner).


Thanks so much for your support!

Wednesday, December 8, 2010

Holiday Decorating on a Dollar

A few weeks ago I stumbled across a cool article that showed how an incredibly crafty lady made a chandelier using Mardi Gras beads from the dollar store - see it for yourself here. So that got me thinking about what kind of fun holiday things I could make using items from the dollar aisles and dollar stores. Here's what I came up with...

Decorative Packing Tape - $1
A while ago I discovered some amazing packing tape in the dollar section at Michael's craft store - here are some of the things I made with that find. I was so happy to see that Michael's is still selling the decorative tape, but this time it's holiday-themed! Here are a few of the styles I picked up:


A super easy use for the tape is to make drinking straw flags. To make these flags, cut a small section of the tape and attach it to a piece of paper. Then cut out a triangle on one end and glue the flag onto the straw.


One other use for the tape is to create place cards (no, I'll never get tired of place cards). I made this card by cutting a section of the tape and attaching it to a piece of cardstock paper. I then cut around the top part of the design and added a label for the name.


Holiday Pipe Cleaners - $1

Whoever came up with the idea of lining the checkout aisle with products was a genius - I fall for it every time! I found these holiday-themed chenille stems while waiting in line at Joann's craft store and just had to have them.


I think it's really cool when words are "written" out using different materials (like twine, ribbon, etc). So I thought I'd spell something using the pipe cleaners...not sure why I chose "MERRY" - it was just the first holiday word that popped into my head. I decided to mount the pipe cleaners onto the side of a box that can be used for a ton of things - in this case holding utensils for a dinner party.


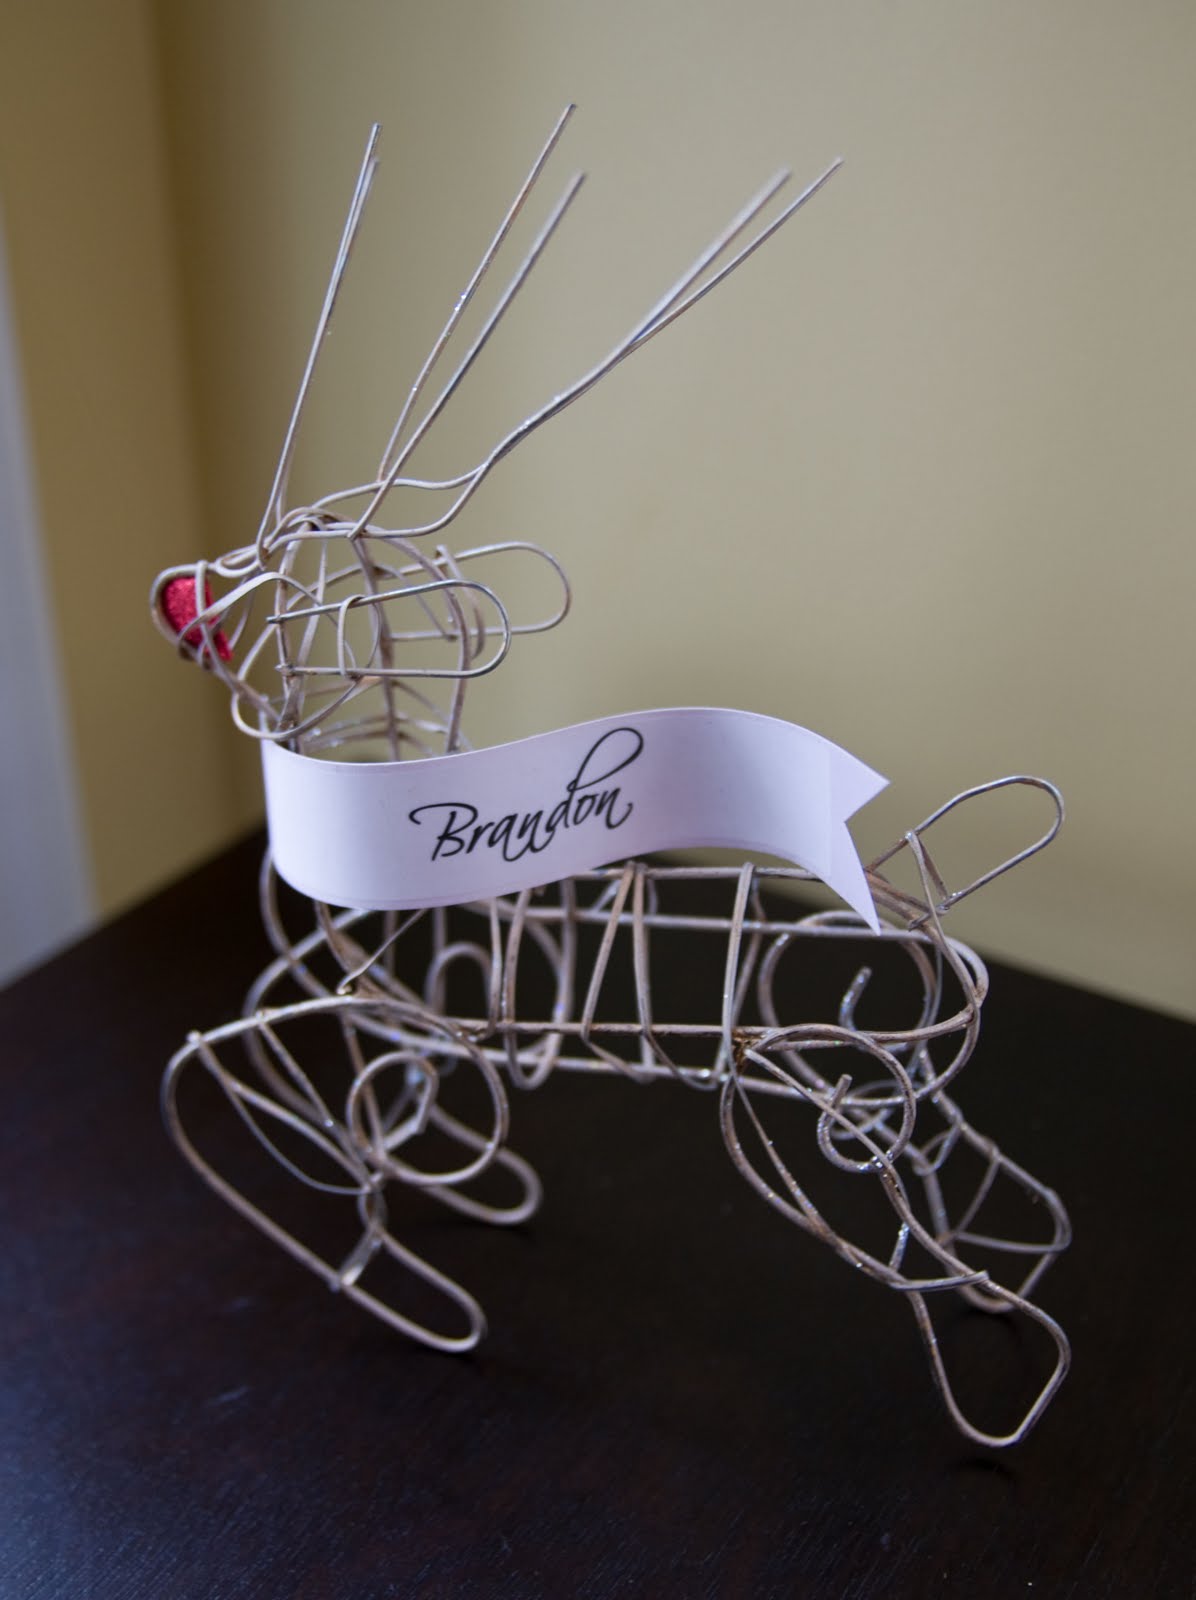
Tabletop Deer - $0.25 (Clearance)

I found this deer in the clearance section at the dollar store. It was so unique (okay, and so inexpensive) that I had to buy it!


This is going to come as a shock and a surprise, but I decided to use this clearance find as a - wait for it - place card. Come on, you gotta love the addition of the little red nose!


Felt Ornaments - $1
Another dollar store find were these felt ornaments. It was the colors that first caught my eye, and then I fell for the intricate designs that are cut in the ornaments.


One super easy way to decorate with the ornament is to mount it onto a charger plate using hot glue. I displayed this one on the mantle along with other holiday decorations...


One other decorating idea for the felt ornament is to make a tabletop tree. One package of ornaments comes with 2 Christmas trees. To create this look, first cut one ornament halfway down the center starting from the top. Then cut the other ornament halfway up the center starting from the bottom. Finally slide the two pieces together to form one tree.


I'm working on another holiday dollar store project right now, so if all goes well I'll share those pics soon.

Wednesday, December 1, 2010

Decorating with Christmas Lights

Last year I racked up on tree lights during my annual day after Christmas shopping spree. I bought a ton of those old school C9 lights (see below) for next to nothing. So now I feel compelled to do something creative with them to justify the purchase.


Here are a couple of super easy things you can make using Christmas lights to decorate your house for the holidays.


Idea #1: A Topiary

Over the summer I participated in (and won!) a Christmas in July contest that Kendra at My Insanity was hosting. Now that December is finally here I can pull out the topiary and display it in my hallway! You can find the directions for creating the topiary here.


Idea #2: A Candle Centerpiece

For this idea you'll of course need Christmas lights, a glass vase and a candle. All you need to do is insert the candle in the vase and surround it with the lights. So easy and kind of nice to look at too!


Here's a close-up...


I love the image of Christmas lights "giving off" candlelight, but one other idea is to place a poinsettia plant in the vase instead of a candle.

Happy decorating!


Saturday, November 27, 2010

Purple Crush!


A few months ago I was introduced to an incredibly cool and ridiculously creative lady who inspires me daily...and I really mean every day. Kristy, aka the Purple Pug, is currently conducting what she calls "an experiment in nice" on her blog. For 365 days she is profiling someone she thinks you should know - a "crush" in Pug vernacular. It was my great honor to be selected as crush #40 this week - can life get any better than that? Please check out the amazingly sweet shout out here.

But more importantly, please take some time to learn more about the Purple Pug - leave lots of time though because she has tons of amazing products to peruse. Here is her site...enjoy!


Friday, November 26, 2010

Shopping for a Great Cause...

Happy Black Friday - I hope you all got some fantastic deals like I did at 5am this morning. Yes, I'm one of those people who actually looks forward to running through stores in the wee hours of the morning in search of a sale or two.

Speaking of sales, there is a great 2-for-1 deal going on today over at the Children's Party Network for the East Coast/West Coast Tablescape challenge. It is my great pleasure to be playing for the East, but regardless of which team takes the challenge the real winner will be Project Night Night - you can learn more about the challenge and the charity here.


So, today only, you can purchase 1 ticket and have 2 entries in the raffle. The goal is to sell 100 tickets by December 6th. If you are interested in purchasing a ticket (or lots and lots of tickets), please go here.


Wednesday, November 24, 2010

Thanksgiving by Candlelight

Here are some last minute ideas for easy-to-make candles that can dress up your Thanksgiving table. I created 3 different designs using materials that I had laying around the house.

Design #1
A simple candle holder made out of an empty soup can and ribbon.


Just remove the soup label, wrap the ribbon around the can and you're done.


Design #2
Take 3 pears and attach them together using toothpicks in a triangle shape. Then drop a long taper in the middle - that's it.


Design #3

This last design requires the use of a Cricut machine - my new favorite toy. Load 3 separate strips of ribbon into the machine and cut the words "happy" "thanks" "giving" out. Then attach the ribbon around the candles - done.


Happy Thanksgiving - I hope you have a fabulous holiday!


Tuesday, November 16, 2010

DIY Thanksgiving Centerpiece

Okay, I have to admit that I'm in denial that Thanksgiving is happening next week. We're still working our way through Halloween candy at my house, so it's hard to move on to the next holiday so quickly!

Speaking of Halloween, the ridiculously talented people over at Martha Stewart created a great bat candy jar craft that serves as the inspiration for this post.

Here's a really simple centerpiece that you can make for Thanksgiving...


Here are the instructions from Martha's tutorial that I followed to construct this centerpiece (the steps I added are indicated with an asterisk):

Tools and Materials

White or cream card stock
*Pilgrim Hat template
Scissors
Xyron Creative Station with permanent adhesive cartridge (*if you don't own a Xyron, try using double-sided adhesive sheets)
Black beans
White beans
*Corn
*Large vase
*Empty plastic container to hold flowers

How-To
1. Print the pilgrim hat template on card stock. Trim card stock to a size to fit the vase, and run through Xyron so the front of the template is covered in adhesive. Here's the template I used:


2. Peel paper to expose adhesive. Cover the black area with black beans,the yellow area with corn and the white area with white beans.

3. When the sheet is fully covered, slide it into the vase. Press against glass.

4. Insert the empty plastic container into the vase behind the sheet. Then fill it with flowers.

5. Finally, fill jar with white beans.


So from this...


...to this.


To quote Martha, it's a good thing!


Thursday, November 11, 2010

Craft Wars - The Saga Begins

I recently hooked up with a fantastic group of party people over at the Children's Party Network. In additional to all of the great party info, the network recently became even more fun with the addition of Craft Wars - a crafting challenge!


The inaugural challenge for Craft Wars is to create a child's party-related item using a cereal box as craft material. My first reaction was to take a pass on this one, but I love a good challenge!

A few years ago I saw an article in Parents magazine about constructing a carousel cake topper using popsicle sticks. So I decided to tweak that idea for this challenge. I used parts of cereal boxes to form the tent and the carousel horses. Here's the result...


And then my son insisted that I include a nice glass of milk to go with the cake...


Thanks to the folks over at CPN for coming up with such a clever contest. I can't wait for the next challenge!

Sunday, November 7, 2010

Last Minute Thanksgiving Place Cards

No matter how much planning goes into Thanksgiving, I always manage to forget something until the very last minute that threatens to derail the entire meal. Last year it was place cards. Okay, maybe I'm being a little dramatic about the derailment part, but the type-A person in me gets really frustrated when a great plan does not come together - especially when it's a party.

I thought it would be fun to recreate the terror I faced last Thanksgiving and try to make a cool place card in 5 minutes or less using limited supplies. Imagine the clock starting now...

The only items I have to construct the place card are black and white cardstock paper, yellow ribbon and a pair of scissors.


The first thing that came to mind was a pilgrim hat. Here are the steps to make the place card:

A. Cut and fold the white cardstock paper in half to make a tent. Then cut 2 parallel slits vertically and 1 long horizontal slit across the bottom.

B. Cut out a small rectangle using the black cardstock paper and slightly bend it into a "U" shape. Insert each end of the "U" into the parallel slits in the white paper.

C. Cut out a circle using the black cardstock paper - the diameter of the circle should match the length of the long slit that was made in the white paper (this does not need to be exact - just eyeball it). Trim one side of the circle and then insert it into the long slit in the white paper. This is the brim of the hat.

D. Cut out a small square from the yellow ribbon. Then cut a smaller square inside that piece to make the "buckle". Set the ribbon against the side of the U-shaped black paper.

E. Cut out a small semi-circle using the black cardstock paper and place it on top of the U-shaped paper. This will be the top of the hat.

Here's the result...


No adhesives required and it took less than 5 minutes to construct. Hope this post helps you avoid place card drama this Thanksgiving!


Blog Template by YummyLolly.com